What is Mutual Transport Layer Security (mTLS)?
1. Introduction
mTLS stands for mutual Transport Layer Security and is a security protocol that enhances standard TLS by requiring both the client and server to authenticate each other before establishing a secure connection.
While standard TLS only verifies the server’s identity, mTLS adds a layer of client authentication through digital certificates. This mutual authentication provides stronger security for applications and services, especially in environments like microservices and cloud-native architectures where secure communication between components is essential.
2. Real-World Examples
While it is not common practice for normal consumers to use mTLS, critical infrastructure services such as 5G, financial services and healthcare data exchanges do. After all, you wouldn’t want such critical servers to simply trust any Tom, Dick or Harry, would you?
3. mTLS Call FLow
Still following? Good, here’s a visual representation of how a client initiates a mTLS session with the server.
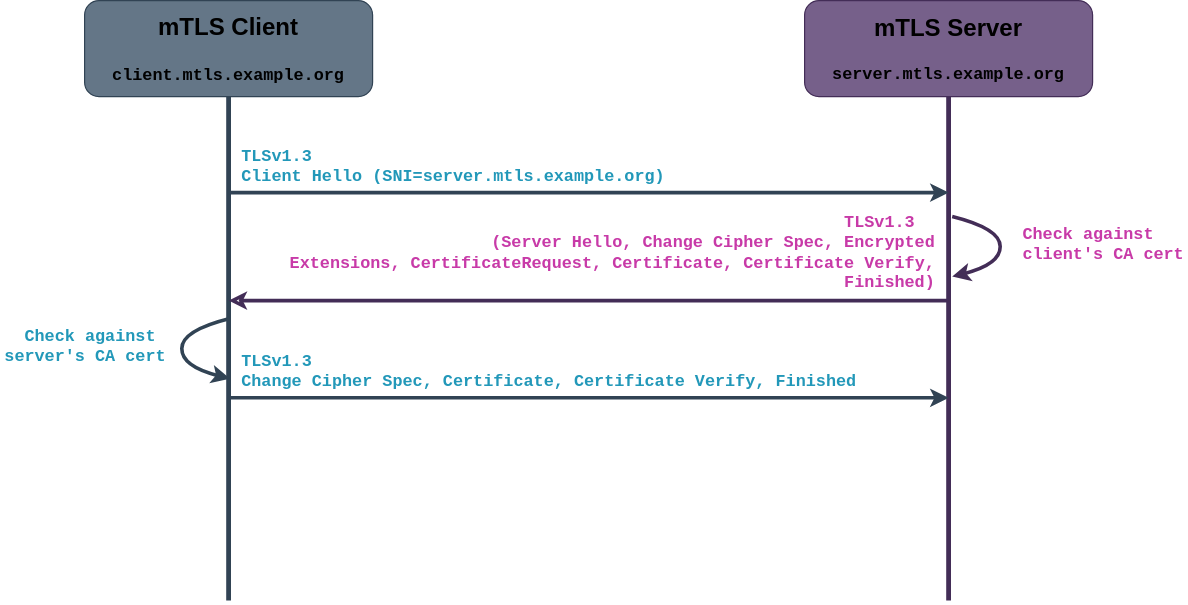 mTLS Client-Server Call FLow
4. Python Implementation
For this simple experiement, we will generate a self-signed certificates for both the client and the server. If you do not know how to do so, I highly recommend to check out my previous post on generating self-signed certificates using OpenSSL.
Feeling lazy? Feel free to re-use these set of keys and certs but do take note that they will expire on 31st of May 2028:
4.1 mTLS Server
First, we need a basic TCP socket that will listen for incoming connections. This is just your standard server setup in Python.
import socket, ssl

ip = "127.0.0.1"
port = 4443

sock = socket.socket(socket.AF_INET, socket.SOCK_STREAM)
sock.setsockopt(socket.SOL_SOCKET, socket.SO_REUSEADDR, 1)
sock.bind((ip, port))
sock.listen(5)
Next, we create a SSLContext to handle the TLS stuff. Here we load the server’s certificate and private key and tell Python to require a client certificate signed by the client CA.
ssl_ctx = ssl.create_default_context(ssl.Purpose.CLIENT_AUTH)

ssl_ctx.options |= ssl.OP_NO_SSLv2 | ssl.OP_NO_SSLv3
ssl_ctx.check_hostname = False
ssl_ctx.load_cert_chain(certfile="server.crt", keyfile="server.key")
ssl_ctx.load_verify_locations(cafile="client_ca.crt")
ssl_ctx.verify_mode = ssl.CERT_REQUIRED
Finally, we sit in a loop and wait for clients to connect. When a client shows up, we wrap the socket in SSL and read some data from it.
while True:
    newsock, addr = sock.accept()
    sslsock = ssl_ctx.wrap_socket(newsock, server_side=True)
    data = sslsock.recv(1024)
You may get my implementation of the server here.
4.2 mTLS Client
On the client side, we start with a regular TCP connection to the server. Pretty standard stuff.
import socket, ssl

server_ip = "127.0.0.1"
server_port = 4443

sock = socket.socket(socket.AF_INET, socket.SOCK_STREAM)
sock.connect((server_ip, server_port))
Next, we set up our SSLContext for the client. We load the client certificate and key and tell it to verify the server certificate using the server CA. Do take note that for the current client’s implementation, I have set ssl_ctx.check_hostname = True. This is to show the Server Name Indication (SNI) extension later on in our experiment.
ssl_ctx = ssl.create_default_context(ssl.Purpose.SERVER_AUTH)

ssl_ctx.options |= ssl.OP_NO_SSLv2 | ssl.OP_NO_SSLv3
ssl_ctx.check_hostname = True
ssl_ctx.load_cert_chain(certfile="client.crt", keyfile="client.key")
ssl_ctx.load_verify_locations(cafile="server_ca.crt")
ssl_ctx.verify_mode = ssl.CERT_REQUIRED
Finally, when wrapping our TCP socket in TLS to establish the secure session, we have to specify the server_hostname as we indicated to check host name in the previous listing. To put the cherry on top of the cake, we send a quick dummy message to the server just to prove the connection works.
sslsock = ssl_ctx.wrap_socket(sock, server_hostname="server.mtls.example.org")
sslsock.sendall(b"Hello from client")
You may get my implementation of the client here.
4.3 Simulation
-
Start wireshark capture on loopback (lo) interface
-
Start the server
$ python3 server.py -
Start the client with
SSLLOGKEYFILEvariable for decryption later in Wireshark.$ SSLKEYLOGFILE=/tmp/sslkeys.log python3 client.py -
Go to Edit > Preferences > Protocols > TLS. Under (Pre)-Master Secret Log filename, put “/tmp/sslkeys.log”
5. Conclusion
And there you have it! We’ve gone from understanding what mTLS actually is, to seeing how it works in real life, and even got our hands dirty writing a simple Python client and server to play around with mutual authentication.
mTLS might sound fancy, but at its core it’s just TLS with a little extra trust. If you’ve followed along with the code and the simulation video, you can now spot the handshake, check out the certificates, and see mutual authentication in action. Plus, playing around with Python makes it way easier to experiment without breaking anything in production.
So next time you hear someone talk about mTLS, you’ll know it’s basically TLS but with extra CA cert verification.
6. Resources
Client:
Server: